Aion 2Class guideTW / KR edition
ElementalistSpirit Master guide
Spirit Master (the game calls it Elementalist; KR 정령성, TW 精靈星) is a genuinely good multi-dimensional class. It's fun to play and fun to theorycraft: it supports multiple builds and setups, all of them strong, with very few weak points. It performs in every type of content: PvE, 1v1, group PvP, and large-scale PvP. It has some of the highest potential in the game if you want to sweat, and it still works played casually. That range is exactly what makes it multi-dimensional.
Tier lists keep grading the class C or D. That's misleading. Those grades rank classes per mode in isolation; Spirit Master's case is that it is strong in all of them at once. Played casually, the whole package is a solid B+ class; fully mastered, it is without a doubt an S‑tier all-rounder.
Identity: a tanky mage with a cerebral PvP playstyle. This is not a burst class. It's a kiting class you play with strategy, and PvP success comes down to extremely good timing on what to use and when. In PvP you can run tanky builds or damage builds and both work extremely well. In PvE the floor is casual-friendly, but reaching maximum damage means mastering uptime on all your buffs while rotating your skills correctly.
Who is Spirit Master for? Players who like a challenge and like having options in gearing, skill setups, and combos, and who want to play strategically in PvP. In PvE it fits both people who want that same challenge and people who just want to play casually.
This guide was written after reaching 700k CP, and after testing the class across different variables: PvP against different classes, different setups in different conditions (including ping), and different gear.
How this guide reads: each build opens with its planner link and the model of how the class works in that mode, then the choices, with the reasons inline so nothing has to be followed blindly. Hover or tap any underlined skill name or icon to see its description and specializations.
Chapter01
PvE Build
- 1.1Build planner
- 1.2How SM works in PvE
- 1.3Skill specs & skill bar
- 1.4Stigma
- 1.5Where skill levels come from
- 1.6Arcanas — the PvE set
- 1.7Rotation & buff uptime
- 1.8Macros
- 1.9Gear, manastones, engravings, wings & title
- 1.10Pantheon Stat Focus
- 1.11Genus Insight — Season 1 focus
- 1.12Benchmarks — am I doing it right?
1.1Build planner
The link opens BiS pve slots; the same character carries Season 1 PvE Crafted full and Season 1 Heroics builds (switch via the build selector).
1.2How SM works in PvE
The highest damage output comes from Elemental Fusion and the spirits, primarily Summon: Ancient Spirit and Summon: Fire Spirit.
Spirit damage is not fixed: a spirit's damage depends on your stats and buffs at the moment of summon (the snapshot rule). That makes basic-attack weaving the core skill expression of the class: keep 5 stacks of the Earth Tremor attack-increase buff (대지 진동, the basic attack) at 100% uptime, and time every summon inside it. Summon without the 5-stack buff and your spirits lose a large chunk of attack, which costs you a large chunk of your total damage.
Fire Spirit gets the most uptime. Of the base spirits, Fire Spirit deals the most damage, so when rotating through spirits summon Fire Spirit last: it stays out dealing damage while the other spirits' cooldowns come back.
Why the weave is free, and when it isn't. The basic attack can be animation-canceled and woven between every other skill, so keeping the 5-stack buff up costs you no cast time and no core DPS skill. In theory. In practice the weave is very ping-dependent: reaching the class's ceiling wants 80%+ combat speed and under ~50 ms ping.
The DoT & debuff layer. Spirit Master runs a lot of damage-over-time effects that also debuff the target to take more damage, chiefly Jointstrike: Corrode and Jointstrike: Curse. With enough cooldown reduction the Corrode DoT reaches 100% uptime, which is a large DPS increase on its own.
1.3Skill specs & skill bar
Each active skill selects 3 of its 5 specializations (stigmas instead auto-spec every 5 levels).
| Skill | Spec pick | Level |
|---|---|---|
Cold ShockActive | 12345Lv 16–19 12345Lv 20 | 16 |
CombustionActive | 12345 | 20Must |
Soul's CryActive | Not used in PvE | |
Summon: Fire SpiritActive | 12345 | 20Must |
Summon: Water SpiritActive | 12345 | 16is okay — 20 is good as well |
Summon: Wind SpiritActive | Not used in PvE | |
Summon: Earth SpiritActive | 12345 | 16 |
Jointstrike: CurseActive | 12345+2 as the extra spec at Lv 20 | 16 |
DefianceActive | 12345 | 16 |
Elemental FusionActive | 12345 | 20Must |
Dimensional ControlActive | 12345+4 at Lv 20 | 16 |
Rapid ScattershotActive | 12345Below Lv 16 12345At Lv 16 | 16 |
pickedadded laterHover or tap a number for what that spec does.
Reading the level column: three skills are hard Lv-20 musts (Combustion, Fire Spirit, Elemental Fusion). Summon: Water Spirit is fine at 16 and nice at 20; everything else stops at 16. Passives have their own priorities, below.
Passives — priority order
- 1Mental FocusMax itTarget32 in Season 1 · 36 once the Scales arrive
- 2Spirit StrikeA close secondTarget28–30 in Season 1 · 32–34 with the Scales
- 3Element UnificationIts crit damage boost buff earns the slotTargetWhatever the rolls leave after 1 and 2
- 4Spirit RevitalizationTargetWhatever the rolls leave after 1–3
Skill bar: two-hold play. Hold LMB (Cold Shock) plus RMB, the macro key (running Summon: Water Spirit → Elemental Fusion → Flame Blessing), steer, and press the remaining buffs by hand. Full layout in the screenshot below.
Keybinds: three rebinds, all under Key Settings.
- Macro keyRMB
Bind the in-game macro (Key Settings → General → Play → basic skill assist function) to the right mouse button. The two-hold is then LMB + RMB, both on the mouse.
- RMB skill lineT
The stacked skill line that ships on right-click moves to T, since RMB is now busy holding the macro. It is the far-right column in the bar screenshots, labelled T, and this guide calls it the T line from here on.
- Dismiss all spirits`
Bind the key that unsummons every spirit to the grave key, left of 1: all spirits come off with one press, right next to the number row.
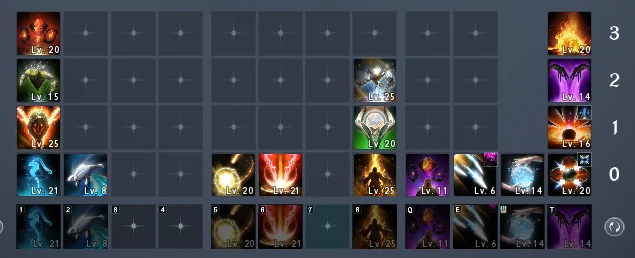
Reading the bar:
- Line 1, spirit spam + Jointstrike: Corrode. Corrode sits right after Water Spirit because the highest-DPS hit of the Corrode jointstrike is the Water Spirit joint skill. Wind Spirit is not used at all. Fire Spirit sits last so it has the most uptime: it has the highest DPS output while out, and the best chance of triggering a skill that grants Elemental Fusion stacks.
- Siphon: sustain, and a shield when needed.
- Jointstrike: Destructive Attack: use on cooldown, but never at the cost of Earth Tremor stacks or an Elemental Fusion proc.
- Buffs + Ancient Spirit line: the buffs sit before Ancient Spirit because any spirit summon inherits the buffs active at the moment of summon. Trigger the buffs first and use them on cooldown, and every summon carries maximum damage amplification.
- T line (the former RMB line): stacked by damage output, with priority on Elemental Fusion.
1.4Stigma
Season 1 has 4 stigma slots; TW currently has 6. These four are the priority; in a 4-slot world this is the set:
- 1Summon: Ancient SpiritLv 25 · 1st
- 2Enhance: Spirit's BenedictionStays below 25
- 3Jointstrike: CorrodeLv 25 · 2nd
- 4Flame BlessingLv 25 · 3rd
Leveling to 25: at most 3 skills can sit at Lv 25. Push Ancient Spirit → Jointstrike: Corrode → Flame Blessing to 25 in that order (Benediction is the one that stays below 25).
1.5Where skill levels come from
- Lv10Skill points
- Lv14First four daevanion boardsNezekan, Zikel, Vaizel, Triniel
- Lv20+Gear and arcanasNo cap at 20
Every skill can be leveled to 10 with skill points. The first four daevanion boards (Nezekan, Zikel, Vaizel, Triniel) raise your base skill level to 14. Everything past that comes from gear and arcanas:
- Active skill levels (+1) roll on rings, weapon, and guard.
- Passive skill levels (+1) roll on all armor pieces, earrings, and necklace — ten slots in total: helmet, torso, shoulders, gloves, pants, boots, cape, necklace, and both earrings.
- A Legend arcana carries four skills, at +4 / +3 / +1 / +1.
There is no cap at 20. A skill climbs as high as you can stack levels onto it, and the passives run far ahead of the actives because all ten gear slots can roll the same one. What limits you is slots, not a ceiling — a roll spent on one skill is a roll not spent on another.
In practice that splits two ways. Actives reach 20 by taking +4 from arcanas and +1 from each ring: 14 + 4 + 2 = 20, which is the target for the three PvE musts. Passives ride every armor slot that rolls them, which is what carries Mental Focus to 36 and Spirit Strike to 34 in a finished set.
1.6Arcanas — the PvE set
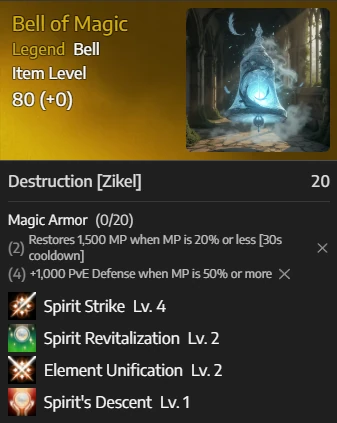
Arcanas are equippable slots by type (Parchment, Grail, Compass, Bell, Mirror, Libra); each piece carries an Empyrean Lord attribute, counts toward a set bonus, and, the reason they matter here, grants levels to specific skills.
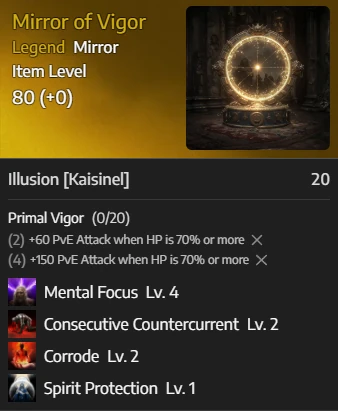
- Primal Vigor
- 2-piece+60 PvE Attack at 70%+ HP
- 4-piece+150 PvE Attack at 70%+ HP
- Magic Armor
- 2-pieceRestores 1,500 MP at 20%- MP (30s cooldown)
- 4-piece+1,000 PvE Defense at 50%+ MP

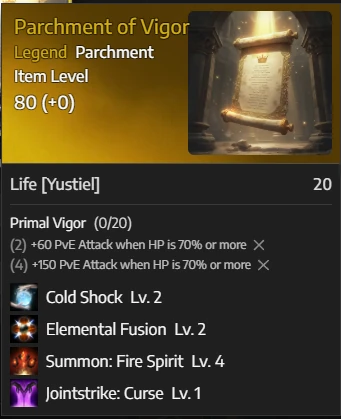
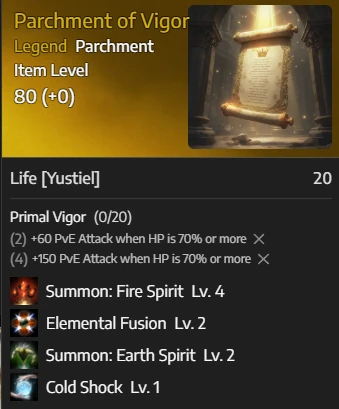
Parchment of Vigor
Legend ParchmentLife [Yustiel] 20
Primal Vigor
- +4
 Summon: Fire Spirit
 - +3
 Elemental Fusion
 - +1
 Dimensional Control
 - +1
 Jointstrike: Curse
- +4

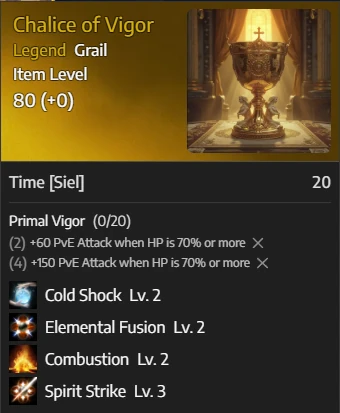
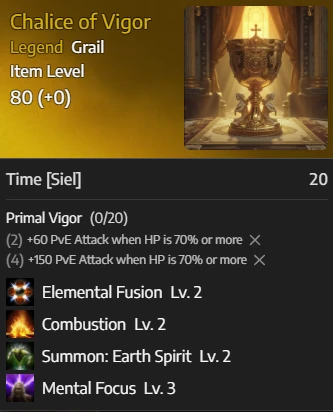
Chalice of Vigor
Legend GrailTime [Siel] 20
Primal Vigor
- +4
 Mental Focus
 - +3
 Spirit Strike
 - +1Elemental Fusion
- +1
 Element Unification
- +4
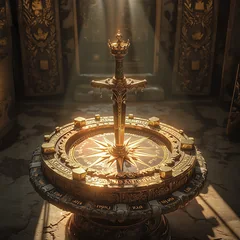
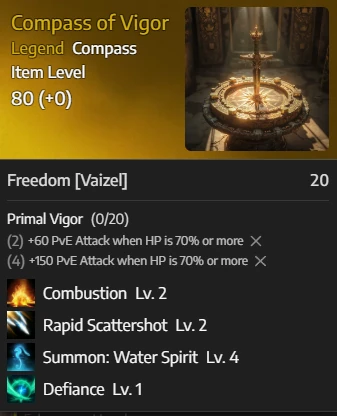
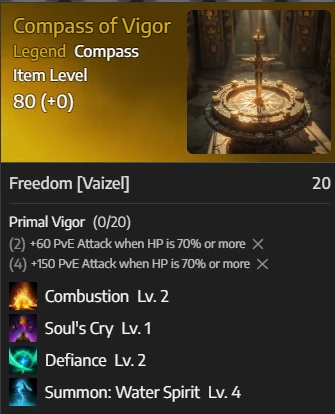
Compass of Vigor
Legend CompassFreedom [Vaizel] 20
Primal Vigor
- +4
 Combustion
 - +3
 Summon: Water Spirit
 - +1
 Summon: Wind Spirit
 - +1
 Soul's Cry
- +4
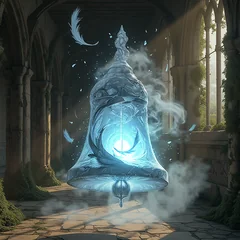
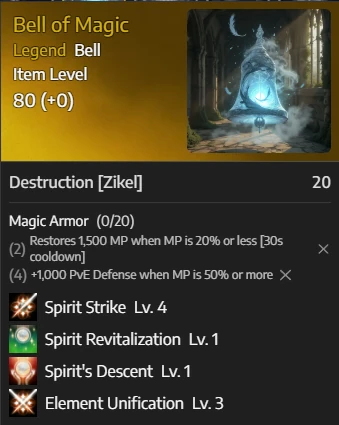
Bell of Magic
Legend BellDestruction [Zikel] 20
Magic Armor
- +4Spirit Strike
- +3Element Unification
- +1
 Spirit's Descent
 - +1
 Spirit Revitalization
- +4
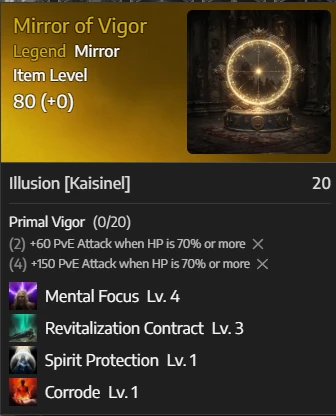
Mirror of Vigor
Legend MirrorIllusion [Kaisinel] 20
Primal Vigor
- +4Mental Focus
- +3
 Consecutive Countercurrent
 - +1
 Corrode
 - +1
 Revitalization Contract
- +4
Scales
Legend LibraDestruction [Zikel] 20 · Destiny 20
Set bonus pending
- +4Mental Focus
- +3Spirit Strike
- +1Element Unification
- +1Summon: Water Spirit
- +4
Where every skill lands
Base 14, plus arcanas, plus gear. Actives take +1 per ring that rolls them; passives take +1 per armor or accessory slot that rolls them.
- Base (skill points + boards)
- Arcanas
- Rings
- Lv 20 line
- CombustionArcanas +4 (Compass) · Rings +2 (both rings)Total level 20
- Elemental FusionArcanas +4 (Parchment 3 · Chalice 1) · Rings +2 (both rings)Total level 20
- Summon: Fire SpiritArcanas +4 (Parchment) · Rings +2 (both rings)Total level 20
- Summon: Water SpiritArcanas +4 (Compass 3 · Scales 1) · Rings +2 (both rings)Total level 20
 Cold ShockRings +2 (both rings)Total level 16
- Jointstrike: CurseArcanas +1 (Parchment) · Rings +1 (Ring 1)Total level 16
- Dimensional ControlArcanas +1 (Parchment) · Rings +1 (Ring 2)Total level 16
- Soul's CryArcanas +1 (Compass)Total level 15
- Summon: Wind SpiritArcanas +1 (Compass)Total level 15
- Defiance · Rapid Scattershot · Summon: Earth SpiritBase onlyTotal level 14
Show as table
| Skill | Arcanas | Rings | Total |
|---|---|---|---|
| Combustion | +4 (Compass) | +2 (both rings) | 20 |
| Elemental Fusion | +4 (Parchment 3 · Chalice 1) | +2 (both rings) | 20 |
| Summon: Fire Spirit | +4 (Parchment) | +2 (both rings) | 20 |
| Summon: Water Spirit | +4 (Compass 3 · Scales 1) | +2 (both rings) | 20 |
| Cold Shock | — | +2 (both rings) | 16 |
| Jointstrike: Curse | +1 (Parchment) | +1 (Ring 1) | 16 |
| Dimensional Control | +1 (Parchment) | +1 (Ring 2) | 16 |
| Soul's Cry | +1 (Compass) | — | 15 |
| Summon: Wind Spirit | +1 (Compass) | — | 15 |
| Defiance · Rapid Scattershot · Summon: Earth Spirit | — | — | 14 |
- Base (skill points + boards)
- Arcanas
- Gear slots
- Mental FocusArcanas +12 (Chalice · Mirror · Scales, +4 each) · Gear slots +10 (all ten)Total level 36
- Spirit StrikeArcanas +10 (Bell 4 · Chalice 3 · Scales 3) · Gear slots +10 (all ten)Total level 34
- Element UnificationArcanas +5 (Bell 3 · Chalice 1 · Scales 1) · Gear slots +10 (all ten)Total level 29
- Spirit RevitalizationArcanas +1 (Bell) · Gear slots +4 (shoulders, necklace, both earrings)Total level 19
- CorrodeArcanas +1 (Mirror) · Gear slots +3 (necklace, both earrings)Total level 18
- Consecutive CountercurrentArcanas +3 (Mirror)Total level 17
- Revitalization ContractArcanas +1 (Mirror)Total level 15
- Spirit's DescentArcanas +1 (Bell)Total level 15
Show as table
| Skill | Arcanas | Gear slots | Total |
|---|---|---|---|
| Mental Focus | +12 (Chalice · Mirror · Scales, +4 each) | +10 (all ten) | 36 |
| Spirit Strike | +10 (Bell 4 · Chalice 3 · Scales 3) | +10 (all ten) | 34 |
| Element Unification | +5 (Bell 3 · Chalice 1 · Scales 1) | +10 (all ten) | 29 |
| Spirit Revitalization | +1 (Bell) | +4 (shoulders, necklace, both earrings) | 19 |
| Corrode | +1 (Mirror) | +3 (necklace, both earrings) | 18 |
| Consecutive Countercurrent | +3 (Mirror) | — | 17 |
| Revitalization Contract | +1 (Mirror) | — | 15 |
| Spirit's Descent | +1 (Bell) | — | 15 |
Mental Focus and Spirit Strike are the two passives worth building the whole soul-bind table around: they sit on all ten armor and accessory slots, which is exactly why the tables below put them near the top of nearly every piece.
Season 1: no Libra
The Scales is a Season 4 slot. Drop it and you lose Mental Focus +4, Spirit Strike +3, Element Unification +1 and Summon: Water Spirit +1 — Water Spirit lands on 19, which is still past the 16 it needs. Mental Focus falls to 32 and Spirit Strike to 31. The three musts — Combustion, Elemental Fusion and Fire Spirit — are untouched; none of them use the Libra.
1.7Rotation & buff uptime
Opening
- Always open with the buffs + Ancient Spirit line: Flame Blessing → Enhance: Spirit's Benediction → Summon: Ancient Spirit. Buffs land before the summon so the snapshot catches them.
- Spirits + Corrode line spam: get the base spirits out and the Jointstrike: Corrode DoT running.
- Start your macro and settle into the two-hold.
Ongoing
- Keep rotating your spirits. Elemental Fusion sits in the macro, so it fires the moment it comes up — you don't stop for it.
- Re-cast your buffs as soon as they're available. Don't hold them waiting for Ancient Spirit.
- Keep the basic-attack buff at ×5 at all times. It's okay to delay a spirit summon for an extra Earth Tremor if the buff is about to run out.
- 100% uptime on Jointstrike: Corrode: trigger it the moment it comes off cooldown.
- On low ping, Dimensional Control is added value in the rotation. Put it in the T line, 2nd slot.
1.8Macros
In-game macro (2026-09-08): bound to RMB (see Keybinds under the skill bar), three slots, 10 ms each:
- Slot 1Summon: Water Spirit10 ms
- Slot 2Elemental Fusion10 ms
- Slot 3Flame Blessing10 ms
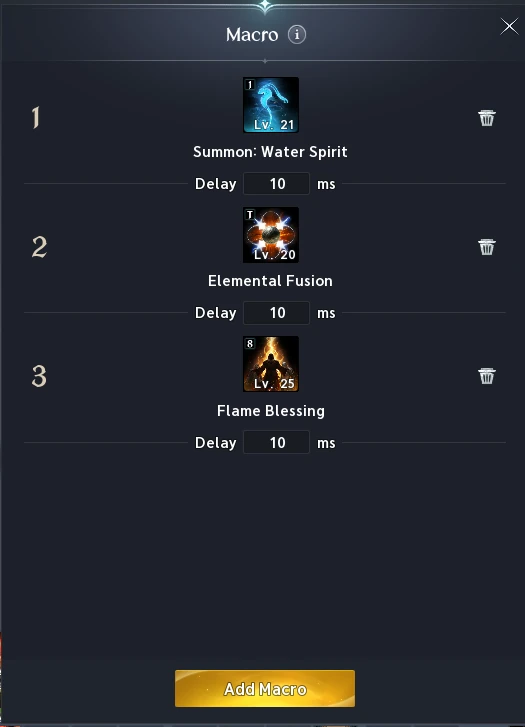
The mouse layer (Razer Synapse): one recorded macro emitting Right Click + Left Click, which with the macro on RMB is the macro key plus Cold Shock; a single held button produces the two-hold.

1.9Gear, manastones, engravings, wings & title
Arcanas have their own section above. Slot-by-slot reference build: BiS pve slots on questlog.
Soul-bind rolls — per piece, best first
Each piece's best soul-bind stat rolls, prioritized 1 → 7. Pieces differ in slot count (4, 5, or 6 substat slots), plus one Philosopher's Stone slot that is always the +1 at the end.
Philosopher's Stone slot
Weapon
- 1Combat Speed
- 2Might
- 3Precision
- 4Damage Boost
- 5Weapon Damage Boost
- 6Status Effect Chance
- 7Multi-hit Chance(Philosopher's Stone)
Guard
- 1Combat Speed
- 2Might
- 3Precision
- 4Damage Boost
- 5Weapon Damage Boost
- 6Status Effect Chance
- 7Multi-hit Chance(Philosopher's Stone)
Helmet
- 1Double Chance
- 2Attack Increase
- 3Spirit Strike
- 4Mental Focus
- 5Attack
- 6Element Unification
- 7Critical Hit(Philosopher's Stone)
Torso
- 1Damage Boost
- 2Accuracy
- 3Attack
- 4Spirit Strike
- 5Mental Focus
- 6Element Unification
- 7Critical Hit(Philosopher's Stone)
Shoulders
- 1Critical Damage Boost
- 2Attack
- 3Mental Focus
- 4Spirit Strike
- 5Element Unification
- 6Spirit Revitalization
- 7Critical Hit(Philosopher's Stone)
Gloves
- 1Combat Speed
- 2Perfect Chance
- 3Spirit Strike
- 4Mental Focus
- 5Attack
- 6Element Unification
- 7Critical Hit(Philosopher's Stone)
Pants
- 1Attack Increase
- 2Damage Tolerance
- 3Perfect Chance
- 4Spirit Strike
- 5Mental Focus
- 6Attack
- 7Element Unification(Philosopher's Stone)
Boots
- 1Perfect Chance
- 2Move Speed
- 3Spirit Strike
- 4Mental Focus
- 5Attack
- 6Element Unification
- 7Critical Hit(Philosopher's Stone)
Cape
- 1Double Chance
- 2Attack Increase
- 3Perfect Chance
- 4Spirit Strike
- 5Mental Focus
- 6Attack
- 7Element Unification(Philosopher's Stone)
Necklace
- 1Attack
- 2Spirit Strike
- 3Mental Focus
- 4Element Unification
- 5Spirit Revitalization
- 6Critical Hit
- 7Corrode(Philosopher's Stone)
Earrings (×2)
- 1Attack
- 2Spirit Strike
- 3Mental Focus
- 4Element Unification
- 5Spirit Revitalization
- 6Critical Hit
- 7Corrode(Philosopher's Stone)
Ring 1
- 1Attack
- 2Combustion
- 3Elemental Fusion
- 4Summon: Fire Spirit
- 5Summon: Water Spirit
- 6Cold Shock
- 7Jointstrike: Curse(Philosopher's Stone)
Ring 2
- 1Attack
- 2Combustion
- 3Elemental Fusion
- 4Summon: Fire Spirit
- 5Summon: Water Spirit
- 6Cold Shock
- 7Dimensional Control(Philosopher's Stone)
Bracelets (×2)
- 1Time [Siel]
- 2Destruction [Zikel]
- 3Wisdom [Lumiel]
- 4Illusion [Kaisinel]
- 5Death [Triniel]
- 6Justice [Nezekan](Philosopher's Stone)
Why the rings are listed separately: the first six priorities are identical on both. Only the Philosopher's Stone differs — Ring 1 takes Jointstrike: Curse, Ring 2 takes Dimensional Control, which lands both on 16.
Manastones
Stat priority, best first, with a heavy focus on Unique (yellow) grade stones:
- 1Damage Boost
- 2Critical Damage Boost
- 3Frontal Attack Damage Boost
- 4Attack
- 5Accuracy
- 6Critical Hit
Wings
The best wings you can get in Season 1 are the Talisra Wings, from the season shop. Until you have those, the next best:
 Best in Season 1Talisra WingsSeason shop
 Next best · 1Dark VeilFerocious Horn Den
 Next best · 2Forest Spirit WingsVakron
Titles
BiS titles for Season 1
- Empty Closet
- Unbound by Genus
- Rule All CreationEarned by collecting 200 types of pets, achievable within Season 1.
1.10Pantheon Stat Focus
Focus your pantheon stats in this order:
- 1Destruction [Zikel]
- 2Illusion [Kaisinel]
- 3Wisdom [Lumiel]
- 4Life [Yustiel]
1.11Genus Insight — Season 1 focus
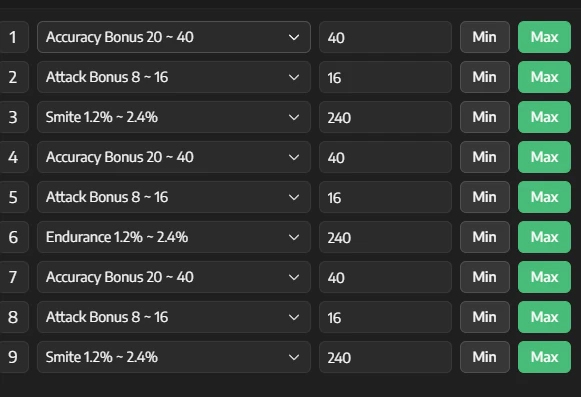
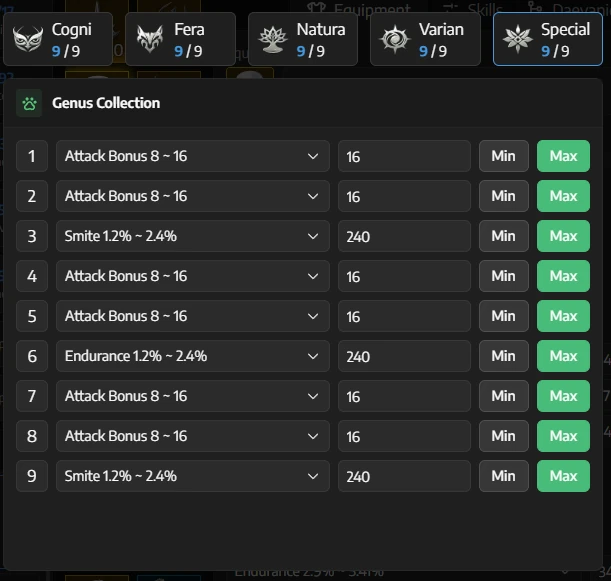
In Season 1, realistically you should focus on one genus set to get its boost as fast as possible. Prioritize PvE stats, with some elements that also help in PvP: Accuracy, Attack, Double Chance, and Endurance.
Cogni, Fera, Natura, and Varian all share the same setup; Special is solely focused on Attack:
- Attack
- Accuracy
- Damage %
- Defense
| Board | Slot 1 | Slot 2 | Slot 3 | Slot 4 | Slot 5 | Slot 6 | Slot 7 | Slot 8 | Slot 9 |
|---|---|---|---|---|---|---|---|---|---|
| Cogni / Fera / Natura / Varian×4 | Accuracy Bonus20–40 | Attack Bonus8–16 | Double Chance1.2–2.4% | Accuracy Bonus20–40 | Attack Bonus8–16 | Endurance1.2–2.4% | Accuracy Bonus20–40 | Attack Bonus8–16 | Double Chance1.2–2.4% |
| Special | Attack Bonus8–16 | Attack Bonus8–16 | Double Chance1.2–2.4% | Attack Bonus8–16 | Attack Bonus8–16 | Endurance1.2–2.4% | Attack Bonus8–16 | Attack Bonus8–16 | Double Chance1.2–2.4% |
| Slot | Cogni / Fera / Natura / Varian×4 | Special |
|---|---|---|
| 1 | Accuracy Bonus20–40 | Attack Bonus8–16 |
| 2 | Attack Bonus8–16 | Attack Bonus8–16 |
| 3 | Double Chance1.2–2.4% | Double Chance1.2–2.4% |
| 4 | Accuracy Bonus20–40 | Attack Bonus8–16 |
| 5 | Attack Bonus8–16 | Attack Bonus8–16 |
| 6 | Endurance1.2–2.4% | Endurance1.2–2.4% |
| 7 | Accuracy Bonus20–40 | Attack Bonus8–16 |
| 8 | Attack Bonus8–16 | Attack Bonus8–16 |
| 9 | Double Chance1.2–2.4% | Double Chance1.2–2.4% |
Heroic totals · all 5 boards
| Stat | Slots | Min | Median | Max |
|---|---|---|---|---|
| Attack Bonus | 18 | 144 | 216 | 288 |
| Accuracy Bonus | 12 | 240 | 360 | 480 |
| Double Chance | 10 | 12% | 18% | 24% |
| Endurance | 5 | 6% | 9% | 12% |
Heroic ranges read from the TW client (2026-08-15). Median is the midpoint of each slot's range.
If you get high rolls (max values), other notable good options for Spirit Master:
- Perfect Chance
- Critical Damage Boost
- Frontal Damage Boost
- Critical Hit
1.12Benchmarks — am I doing it right?
BenchmarkLudra
- Attack
- 6,000
- Accuracy
- 1,500
With PvE weapon + PvE accessories at amp 5 (+20).
Chapter02
PvP Build
2.1Build planner
2.2How SM works in PvP
Spirit Master is more of a kiting class, but it also has a good amount of burst with Elemental Fusion. Even though it's a DPS class, Spirit Master's passives make it by far the most tanky of the ranged DPS classes. It doesn't have the mobility of a Ranger or the burst of a Sorcerer, but it has the defenses and crowd control to compensate.
Playing PvP with Spirit Master relies on knowing your enemy's skills so you can time your own. Use them too late, or too early, and it will most likely cost you the fight.
Your most notable tools
Fear (Curse of Despair, Soul's Cry, Cry of Terror, Assault Terror): unique crowd control only Spirit Masters have.
Dispel (Seize Magic): removes all enemy buffs and deals huge burst damage, plus a silence.
Command: Proxy: an insane defensive buff where most of the damage you receive is shared to your spirits.
DoTs and debuffs: multiple damage-over-time spells and debuffs that apply a multitude of effects on your target.
Burst: Elemental Fusion triggers often to burst your target.
Earth Spirit taunt: one of the most powerful crowd controls in the game. Defiance cannot be used against a taunt.
Spirits: even if you go out of range, your spirits can still hit the target, dealing massive damage and CC'ing them.
When you learn how to use these tools depending on who you're facing, Spirit Master is unstoppable (unless you get giga wallet gapped :) ).
2.3Skill specs & skill bar
| Skill | Spec pick | Level |
|---|---|---|
Cold ShockActive | 12345+5 at Lv 20 | 20Must |
CombustionActive | 12345 | 20the BiS arcana set gets it there for free |
Soul's CryActive | 12345 12345Below 16 | 12is good — 16 is nicer |
Summon: Fire SpiritActive | 12345 | 14deliberately unleveled; the BiS set spends its rolls on the four musts |
Summon: Water SpiritActive | 12345Below 16 12345At Lv 16 | 12–16is enough |
Summon: Wind SpiritActive | Not used in PvP | |
Summon: Earth SpiritActive | 12345 | 16Must |
Jointstrike: CurseActive | 12345 | 20Must |
DefianceActive | 12345+5 at Lv 20 12345Alternative | 20Must |
Elemental FusionActive | 12345 12345Mass-PvP AoE | 20Must |
Dimensional ControlActive | 12345 12345If only Lv 16 | 14deliberately unleveled; the BiS set spends its rolls on the four musts |
Rapid ScattershotActive | Not used in PvP | |
pickedadded laterHover or tap a number for what that spec does.
Reading the level column: the hard Lv-20 musts in PvP are Defiance, Cold Shock, Elemental Fusion and Jointstrike: Curse. The BiS arcana set below is built around exactly those four, and lands Combustion on 20 as a free fifth. The levels shown for everything else are what that set actually delivers.
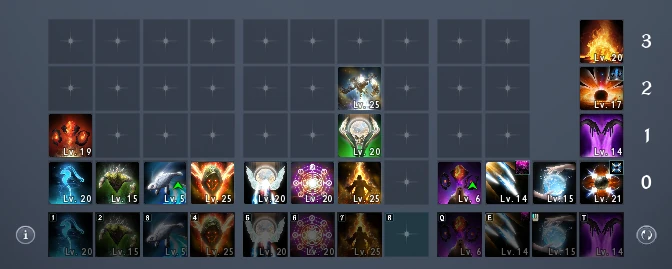
PvP is very non-reliant on the macro. The macro is only used for weaving your T-line bursts. The rest should be played by hand, with good awareness and timing depending on your opponent.
2.4Stigma
The PvP set (Season 1: 4 slots):
- 1Summon: Ancient SpiritLv 20 · 1st
- 2Enhance: Spirit's BenedictionLv 20 · 2nd
- 3Command: ProxyIf available in Season 1Lv 20 · 3rd
- 4Seize MagicLv 20 · 4th
If Command: Proxy is not available, or if you have a 5th slot, run Jointstrike: Corrode.
Priority to level 20: Summon: Ancient Spirit → Enhance: Spirit's Benediction → Command: Proxy / Jointstrike: Corrode → Seize Magic.
2.5Arcanas — the BiS set, and what Season 1 costs you
These are Season 4 arcanas (Item Level 90, all Legend), and the set fills six slots including the Libra. Season 1 has no Libra slot — what that costs you is spelled out below the table.
- Protected Soul
- 2-piece+5% Restoration
- 4-piece+5% Weapon Damage Boost, plus a shield that blocks 10,000 damage for 5s when you drop to 30% HP or less (2 min cooldown)
- Indomitable Dedication
- 2-piece+5% Weapon Damage Tolerance
- 4-piece+5% Critical Damage Tolerance, plus +50% PvP Damage Tolerance for 5s when you are hit by Stun, Knockdown, Airborne, Grab, Frost, or Fear
Parchment of Protection
Legend ParchmentLife [Yustiel] 20
Protected Soul
- +2Elemental Fusion
- +3Cold Shock
- +2Jointstrike: Curse
- +2
 Summon: Earth Spirit
- +2
Chalice of Indomitability
Legend GrailTime [Siel] 20
Indomitable Dedication
- +2Cold Shock
- +2Combustion
- +2Revitalization Contract
- +3
 Spirit Protection
- +2
Compass of Indomitability
Legend CompassFreedom [Vaizel] 20
Indomitable Dedication
- +3Combustion
- +2Summon: Water Spirit
- +1Soul's Cry
- +4
 Defiance
- +3
Bell of Protection
Legend BellJustice [Nezekan] 20
Protected Soul
- +2Spirit Revitalization
- +3Element Unification
- +1
 Spirit Communion
 - +3Spirit Strike
- +2
Scales of Indomitability
Legend LibraLife [Yustiel] 10 · Destruction [Zikel] 10
Indomitable Dedication
- +2Elemental Fusion
- +4Jointstrike: Curse
- +2Spirit Protection
- +1Revitalization Contract
- +2
Mirror of Protection
Legend MirrorIllusion [Kaisinel] 20
Protected Soul
- +4Revitalization Contract
- +2Mental Focus
- +1Consecutive Countercurrent
- +2Spirit Protection
- +4
The set splits 3 / 3 across Protected Soul and Indomitable Dedication, so you run both 2-piece bonuses and neither 4-piece bonus.
How the set adds up
The goal is Defiance, Cold Shock, Elemental Fusion and Jointstrike: Curse at level 20. Base skill level is 14 (skill points to 10, plus the first four daevanion boards), so anything you want at 20 needs exactly +6 from arcanas and rings combined. This set is built to land five skills on exactly that:
- Base (skill points + boards)
- Arcanas
- Rings
- Lv 20 line
- DefianceArcanas +4 (Compass) · Rings +2 (both rings)Total level 20
- Cold ShockArcanas +5 (Parchment 3 · Chalice 2) · Rings +1 (Ring 1)Total level 20
- Elemental FusionArcanas +4 (Parchment 2 · Libra 2) · Rings +2 (both rings)Total level 20
- Jointstrike: CurseArcanas +6 (Parchment 2 · Libra 4)Total level 20
- CombustionArcanas +5 (Chalice 2 · Compass 3) · Rings +1 (Ring 2)Total level 20
Show as table
| Skill | Arcanas | Rings | Total |
|---|---|---|---|
| Defiance | +4 (Compass) | +2 (both rings) | 20 |
| Cold Shock | +5 (Parchment 3 · Chalice 2) | +1 (Ring 1) | 20 |
| Elemental Fusion | +4 (Parchment 2 · Libra 2) | +2 (both rings) | 20 |
| Jointstrike: Curse | +6 (Parchment 2 · Libra 4) | — | 20 |
| Combustion | +5 (Chalice 2 · Compass 3) | +1 (Ring 2) | 20 |
Combustion is the free fifth — it lands on 20 without costing you anything you were hunting for the other four.
Season 1: no Libra
The Scales is where Jointstrike: Curse +4 and Elemental Fusion +2 come from. Take the Libra out and the remaining five arcanas leave you at:
- Jointstrike: Curse 16 — Parchment +2 is the only source, and no ring carries Curse.
- Elemental Fusion 18 — Parchment +2 plus +2 from the rings.
Defiance, Cold Shock and Combustion are untouched; they never used the Libra. So in Season 1, Curse and Elemental Fusion are the two you have to chase on the other five pieces' rolls — everything else in this set already gets you there. The set split becomes 3 / 2, which changes nothing: still both 2-piece bonuses, still neither 4-piece.
The leveling mechanics (skill points to 10, boards to 14, gear + arcanas beyond) are explained in the PvE build and apply unchanged.
2.6Gear, manastones, engravings, wings & title
Soul-bind rolls — per piece, best first
Every armor and accessory piece rolls 5 substats plus one Philosopher's Stone slot — the Philosopher's Stone is always the last entry in the row. The range after a stat is that slot's min ~ max roll; skill substats on the accessories always roll at Lv +1, so they carry no range.
Philosopher's Stone slot
Weapon
- 1Combat Speed
- 2Might
- 3Precision
- 4Damage Boost
- 5Weapon Damage Boost
- 6Status Effect Chance
- 7Multi-hit Chance(Philosopher's Stone)
Guard
- 1Combat Speed
- 2Might
- 3Precision
- 4Damage Boost
- 5Weapon Damage Boost
- 6Status Effect Chance
- 7Multi-hit Chance(Philosopher's Stone)
Helmet
- 1Incoming Heal22.4–25.9%
- 2Status Effect Resist6.38–7.41%
- 3Willpower26–37
- 4Attack Increase2–2.37%
- 5Constitution26–37
- 6Accuracy30–42(Philosopher's Stone)
Torso
- 1Status Effect Resist9.56–11.1%
- 2Damage Boost13.8–15.9%
- 3Regeneration5–5.82%
- 4Double Resist5–5.82%
- 5Constitution38–51
- 6Accuracy46–60(Philosopher's Stone)
Shoulders
- 1Status Effect Resist6.38–7.41%
- 2Critical Damage Boost16.3–18.8%
- 3Regeneration5–5.82%
- 4Endurance Penetration9–10.4%
- 5Defense Increase3–3.52%
- 6Willpower26–37(Philosopher's Stone)
Gloves
- 1Status Effect Resist5.58–6.49%
- 2Regeneration5–5.82%
- 3Combat Speed9.18–10.6%
- 4Perfect Chance5–5.82%
- 5Defense Increase3–3.52%
- 6Constitution22–32(Philosopher's Stone)
Pants
- 1Status Effect Resist7.97–9.24%
- 2Attack Increase2–2.37%
- 3Damage Tolerance11.5–13.3%
- 4Perfect Chance5–5.82%
- 5Constitution32–44
- 6Willpower32–44(Philosopher's Stone)
Boots
- 1Status Effect Resist5.58–6.49%
- 2Move Speed23.2–26.8%
- 3Regeneration5–5.82%
- 4Perfect Chance5–5.82%
- 5Defense Increase3–3.52%
- 6Constitution22–32(Philosopher's Stone)
Cape
- 1Critical Damage Tolerance15.3–17.7%
- 2Status Effect Resist3.99–4.66%
- 3Attack Increase2–2.37%
- 4Perfect Chance5–5.82%
- 5Weapon Damage Tolerance9–10.4%
- 6Constitution16–25(Philosopher's Stone)
Necklace
- 1Intelligence32–44
- 2Accuracy38–51
- 3Revitalization Contract
- 4Spirit Protection
- 5Mental Focus
- 6Accuracy38–51(Philosopher's Stone)
Earrings (×2)
- 1Intelligence26–37
- 2Accuracy31–43
- 3Spirit Protection
- 4Revitalization Contract
- 5Mental Focus
- 6Attack15–24(Philosopher's Stone)
Ring 1
- 1Accuracy24–35
- 2Intelligence20–30
- 3Elemental Fusion
- 4Defiance
- 5Cold Shock
- 6Attack11–20(Philosopher's Stone)
Ring 2
- 1Accuracy24–35
- 2Intelligence20–30
- 3Combustion
- 4Elemental Fusion
- 5Defiance
- 6Attack11–20(Philosopher's Stone)
Bracelets (×2)all 11–20
- 1Time [Siel]
- 2Destruction [Zikel]
- 3Life [Yustiel]
- 4Illusion [Kaisinel]
- 5Freedom [Vaizel]
- 6Justice [Nezekan](Philosopher's Stone)
Brooch
Five additional stats, all +29, no priority order between them:
- Constitution
- Precision
- Might
- Willpower
- Intelligence
Why the rings are listed separately: each ring carries three skill substats, and the pair is built so Elemental Fusion and Defiance land on both rings (+2 each) while Cold Shock and Combustion take one ring apiece. That is the “+2 from the rings” half of the level-20 math above.
Manastones
The focus here is PvP manastones for PvP stats, primarily PvP Accuracy and PvP Attack. Use Intermediate Abyssal manastones. Superior is not worth it (too expensive); sell those instead and make a ton of money.
Wings
For Season 1, Ultimate Daeva or, again, Talisra Wings are your best friends until you can get the Abyss-point wings: Brawler Wings.
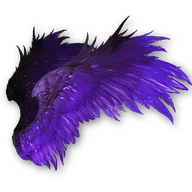 Season 1Ultimate Daeva
- Season 1Talisra Wings
 Abyss-point wingsBrawler Wings
Titles
BiS titles for PvP
- Treading on White Wings
- Saint of Altgard
- Empty Closet
2.7Pantheon Stat Focus
Focus your pantheon stats in this order (same as PvE):
- 1Destruction [Zikel]
- 2Illusion [Kaisinel]
- 3Wisdom [Lumiel]
- 4Life [Yustiel]
2.8Playstyle & combos
Opening a fight
Always have your Earth Spirit summoned. When encountering someone, the first thing you do is use Jointstrike: Curse, which reduces the target's Status Effect Resist. Your Earth Spirit will jump in and try to taunt, and you can re-summon it for an additional taunt proc chance.
Instantly pop your buffs and summon your Ancient Spirit when starting a fight. Spirit's Benediction gives you insane defenses, which helps tank most of the burst; every class opens with their strongest skills. For extra defenses when you get engaged by an Assassin or frozen by a Sorcerer, use Command: Proxy (7-second duration).
The fear game
1Strategy 1
2Strategy 2
Jointstrike: Corrode
Very powerful against classes with a lot of sustain (Cleric, Chanter, Gladiator, Ranger) thanks to its −60% healing reduction and near-30-second DoT duration. Before you cast it, apply Curse and your other DoT effects first so it cannot be cleansed with a healing potion.
Seize Magic (dispel)
Pay attention to enemy buffs. Particularly useful against Gladiators and Clerics, since it can dispel their invulnerability skills. Also very strong against Rangers right after they use their buffs, since those provide a lot of their protection and damage.
General principles
You need to know the other classes as well as you know your own. Spirit Master has a high entry burst with consistent damage output, the ability to kite, and the tools to protect yourself from engages. Use your dash with care: save it to dodge important engages or skills like the Sorcerer's meteor, which ignores evasion and block.
Log
Changelog
Maintained per patch: what the balance patch changed for the class, and which sections were updated in response. Newest first.
Keybinds, PvE level targets and passives
- Keybinds block added under the PvE skill bar: the in-game macro goes on RMB, the skill line that ships on right-click moves to T, and dismiss-all-spirits goes on ` (the grave key, left of 1).
- “RMB line” now reads “T line” throughout — the skill-bar breakdown, Dimensional Control's low-ping slot, the macro table's binding note, and the PvP macro line — matching the bar screenshots, which already show the line on T.
- PvE Lv-20 musts are now three: Combustion, Elemental Fusion and Summon: Fire Spirit. Summon: Water Spirit is fine at 16 (20 is good as well), and every other active in the table stops at 16 — the old “priority 2 / priority 3” push-to-20 notes are gone.
- PvE passives table added: Mental Focus first and maxed (32 in Season 1, 36 with the Scales), Spirit Strike a close second (28–30 → 32–34), Element Unification third for its crit damage boost buff, Spirit Revitalization fourth.
- Follow-through: the Season 1: no Libra note no longer calls Water Spirit at 19 a lost must, and Where every skill lands bolds only the three musts.
PvE arcanas, rings, and the level-cap correction
- There is no cap at 20. The old “aim for exactly level 20, not 21 or higher” rule was wrong and has been removed. Skills climb as high as you can stack levels onto them; what limits you is gear slots, not a ceiling. The section is retitled Where skill levels come from.
- PvE arcana rolls replaced, and the set now runs six pieces including the Scales (Libra). Added a Where every skill lands breakdown giving the final level of every active and passive.
- Rings split into Ring 1 / Ring 2. Both share the first six priorities (Attack, Combustion, Elemental Fusion, Fire Spirit, Water Spirit, Cold Shock); only the Philosopher's Stone differs — Jointstrike: Curse on Ring 1, Dimensional Control on Ring 2, which lands both on 16. Accuracy comes off the rings.
- Season 1 note: without the Libra, Summon: Water Spirit drops off 20 to 19, Mental Focus to 32 and Spirit Strike to 31.
- In-game macro is now three slots: Summon: Water Spirit → Elemental Fusion → Flame Blessing, 10 ms each (was two, ending on Jointstrike: Curse). The skill-bar line updated to match, and the rotation no longer tells you to pause for Elemental Fusion procs — the macro fires it the moment it comes up. New skill-bar and macro screenshots embedded; the levels in the bar shot are the author's current gear, not the BiS targets.
PvE soul-bind revisions
The PvE soul-bind table re-cut across seven pieces. Two themes run through it: Element Unification moves up the armor set, displacing the flat defensive rolls (Endurance, Defense Increase), and Critical Hit drops to the Philosopher's Stone slot wherever it appears.
- Helmet: Endurance out; Element Unification at 6, Critical Hit as the Philosopher's Stone.
- Torso: Accuracy replaces Endurance at 2; Defense Increase out, Element Unification at 6, Critical Hit as the Philosopher's Stone.
- Shoulders: Critical Hit and Endurance out of 5 and 6; Element Unification at 5, Spirit Revitalization at 6, Critical Hit as the Philosopher's Stone (was Defense Increase).
- Gloves: Element Unification up to 6, Critical Hit down to the Philosopher's Stone.
- Pants: Endurance out; Attack at 6, Element Unification as the Philosopher's Stone.
- Rings: Dimensional Control dropped entirely; Accuracy at 6, Cold Shock as the Philosopher's Stone.
- Bracelets: Justice [Nezekan] replaces Life [Yustiel] as the Philosopher's Stone.
PvP gear and arcana update
- Markdown resynced with the live website copy. One paragraph per line, arcana screenshots moved into two-column tables, “My in-game macro” → “In-game macro”.
- PvP soul-bind rolls replaced with the BiS set — every piece, with each slot's min ~ max roll range. Helmet, torso, shoulders, gloves, pants, boots and cape all changed; Double Chance and Mental Focus are no longer targeted on any armor piece. Necklace, earrings and bracelets updated. Rings split into Ring 1 / Ring 2 because their skill substats differ, and a Brooch row added.
- PvP arcanas replaced with the Season 4 set (Protection / Indomitability, six slots including the Libra). Added the “+6 over base 14” math showing Defiance, Cold Shock, Elemental Fusion, Jointstrike: Curse and Combustion all landing on exactly 20, plus a Season 1 note: with no Libra slot, Jointstrike: Curse stops at 16 and Elemental Fusion at 18.
- PvP spec table realigned with the four Lv-20 musts — Defiance, Cold Shock, Elemental Fusion, Jointstrike: Curse. Combustion demoted to a free 20; Summon: Fire Spirit and Dimensional Control now show 14, which is what the BiS arcana set actually grants them.
- Still outstanding: PvP weapon and guarder soul-binds, and fresh screenshots for the new PvP arcana set (the images in that section still show the old Vigor / Magic pieces).